Monday, October 31, 2011

Happy Owloween!

So I decided that Miss Precocious should be an owl for Halloween...because I saw it on Pinterest.
 "Last Minute Kids' Owl Costume"-This pin originally came from Alpha Mom

I am a Chi Omega and of course it is my sincerest (secret) hope that Miss P will be one as well.  So I'm doing all I can to brainwash her instill in her a love of all things owl before she goes to college.  So far this has included an owl-themed birthday party, owl clothing, owl lovies...and most recently, an owl costume for Halloween.

Or Owloween as I'm now calling it.

I saw this cute little do-it-yourself owl costume on Pinterest.  I read the info over at Alpha Mom and I thought I would give it a try.  

The last two costumes we bought were cheaply made and I'm sure they were fabricated from formaldehyde or something even worse.  So I was really excited to make a costume that I knew didn't involve neurological toxins or Asian sweat shops!

These are the materials I chose:


That's a roll of lavender organza, gray knit, pink felt, and a purple bandana.

Yes, a bandana...

And there is no way Miss P would ever keep those cute sunglasses on (the little model from the original post is wearing sunglasses made to look like owl eyes) so I decided to look for an owl hat instead.  I found this one over at The Children's Place.  

Super cute, reusable for the next few winters, and it was only $5 when I bought it!  Fab!

I chose the fabric colors around the color of the hat.  Actually choosing the fabric was the most difficult part of the entire project.

You see, shopping is not easy for me!  I have a disease.  They don't have a medical term for it yet (this is all very serious).  So I'm calling it Retail Anxiety Disorder.  RAD for short.  

I get sweaty and twitchy when I have to make a decision about what items to purchase. I probably looked like this in the middle of Hobby Lobby:

It isn't like this at the grocery store.  There I have a specific list that includes brands, quantities, etc.  

But send me out clothes shopping or, in this case, to find material, and I need four Xanax and a glass of wine! 

That explains why I panicked and bought like...10 yards of fabric (and a bandana).

For someone who is something like 26 inches tall. 

Sigh...

Anyway, the base of the owl body is a plain purple t-shirt from Hobby Lobby.  They have so many colors to choose from!
I would have used a long sleeve shirt but I just couldn't find one that was cheap enough to justify gluing feathers to!

I cut out about 90 feathers.


I ran a strip of hem tape about an inch above the hem of the shirt. 

I chose hem tape because, well honestly I couldn't find my fabric glue. It was one of the things we lost in the move.  (Think very dramatic, like Halle Berry, Things We Lost In The Fire.  Except it's "Fabric Glue-Things We Lost In The Move.")

After I had the hem tape ironed down, I placed the feathers onto the tape in no particular order.

Yeah right!  I am the QUEEN of OCD.  Of course there was an order!  But I tried to make it look like there wasn't.  Can you tell?


I am really glad I accidentally picked a variety of fabrics because when I laid them out next to each other, the texture was really good.

After I got a row of feathers lined up, I just pressed down with all my might using the iron (on the highest dry setting).  Now, I will admit that felt and organza are not the best choices of fabric to pair with hem tape. The felt is too thick and the organza is too thin.  I ended up hot gluing the felt pieces on so they wouldn't fall off.

I made a ring of feathers around the neck.  I may have had to cut the neck a little bit for Miss P's large and precious head to fit through...

And since I had like, oh I don't know, 9 yards of fabric left, I decided to cover her pumpkin tote in feathers too.
I just hot glued those on. Man, I love a hot glue gun!  I can't think of anything else so versatile and useful that only costs $2!!
And here is my little baby hootie testing out her "owl suits" as she calls it.

Hoot Hoot!

So this project was a little time consuming, but it turned out so cute.  I totally love it!  I give it an A++!!  Especially since you could pretty much do this for free using any fabric scraps you might have laying around instead of buying fabric like I did. 

Be extra sweet to any little hooties that come your way and have a Happy Owloween everybody!

Sunday, October 30, 2011

Scream Cheese Brownies

Hey Everyone!  This is a special guest post from The Good Girl over at GoodGirlsInc!  I'm so excited that she decided to share this sweet treat with us.  Be sure to check out her clever blog ASAP! 

So I decided to try this whole create-something-you-saw-on-Pinterest thing. I am not very crafty but I do like to eat. Especially chocolate. So I made some super cool Halloween brownies...because I saw it on Pinterset!


"Scream Cheese Brownies" - This pin originally came from Christy at The Girl Who Ate Everything.

We love sweets in my house. Probably more than we should. But it's Halloween, and everyone's allowed a little extra chocolate, right? So when I was looking around for some Halloween treats to make on Pinterest and saw these brownies, I just had to make them.

This recipe calls for a box of brownie mix, and I decided to use the Pillsbury Halloween Funfetti kind, which is basically regular brownies but with little black, orange and white candy sprinkles on top. It just seemed extra festive! Here's what I started with:


First I mixed the cream cheese filling. Now I will be honest here; when I heard the words "cream cheese" and "brownies" I was a little skeptical. That doesn't sound like the best combination. But I was willing to give it a shot. If it's got chocolate in it then it has to be good. So I got the filling ready to mix:


I used my nifty hand mixer my mother-in-law gave me (I guess she knew that would come in handy at some point) and got it to a smooth consistency like so (it looked pink to me when it was supposed to be orange so I was starting to get a little concerned):


Next I mixed the brownie mix according to the box instructions and filled a greased baking pan with 3/4 of the brownie mixture:


Now it's time to spoon the "orange" filling mixture into the brownie mix. Then put the remaining brownie mix on top and use a knife to pull the filling through the batter to create a marbling effect:


This is the point where I add my Funfetti sprinkles to the top of the brownies (note: the original Pin for Scream Cheese Brownies didn't have this). Then I pop them in the oven for 40 minutes at 350 degrees:


And now I wait. And smell the yummy goodness of brownies coming from my oven. But I've got a sink full of dirty dishes to do and that will help pass some of the time.


You know what else helps pass the time? Starship, lots of wine and some of my favorite websites (Because I Saw It On Pinterest and Good Girls Inc, of course!):


They're finally done! Take a look at how they turned out:


They need to cool completely at room temperature for about an hour and a half, then have to be refrigerated for at least an hour. Then they're ready to be cut and eaten!


Overall I give the Scream Cheese Brownies an A because they taste really good, are pretty easy to make, and are a festive holiday treat!

Happy Halloween!

-The Good Girl

Saturday, October 29, 2011

Jack-o'-Lantern Luminaries

So I decided to make Jack-o'-Lantern Luminaries...because I saw it on Pinterest.
"Crafty in the Kitchen: Mason Jar Lanterns"- This pin originally came from Our Best Bites.

Halloween is probably my most favorite of the non-religious holidays.  The weather is finally perfect, the kids are so cute when they say 'Trick or Treat' that you actually want to give them the last Snickers...

And really, is there any other time of year when this could be considered appropriate?


That's our Jackie-lantern.  Our sweet Jackie Russell.  We love her.  But she did not love that we dressed her up and took her to Pet Smart!  Bless it.  I don't think she got the humor in her being a Jackie-lantern.  So next time, she is going as a...cat. 

Anyway, I saw those adorable jack-o'-lantern luminaries and I decided to try to make some.  I have a collection of old Ragu and baby food jars of various sizes so I am going to be using those instead of Mason jars like the ones in the pin.  


I think Mason jars are definitely a better choice for cuteness, but free is always a better choice...period.

The luminaries in the pin were made by Modpodging tissue to the outside of the jars.  And I don't have any orange tissue.  So I just painted the outside of the jars lightly with some watered-down acrylic paints I already had. 

Luckily, they look better in the dark!  

I used black scrapbook paper to cut out the faces.  Then I glued them on using Elmer's glue sticks. I knew that six pack of glue sticks I got on Amazon would come in handy!  Six pack.  Of glue sticks... Total impulse buy.  Glad I can justify it now. (On a side note, Miss P thought the glue sticks were for her 'wips'.  I guess they do look like lipstick...)


It was so much fun to give them different personalities.  That's Edward there in the middle.  The purple vampire.  Just 20 days until Breaking Dawn.  Not that I'm counting...

I put some real tea lights in the Ragu jars and battery operated tea lights in the baby food jars.  I was scared the real tea lights would make the smaller jars too hot and nobody wants glass blowing up in their face.  Am I right?

So, these are totally adorable...

Poor Edward, I shouldn't have watered that purple paint down so much.  It looks like he's bleeding.  Lesson learned.

My sweet husband, Jake (Training Day or Sixteen Candles?  I'll never tell...) wanted to make one of his own.  
Geaux Tigers!  Ha!  My entire family just hissed in unison.  I mean, Roll Tide...?

This project was so easy and didn't take long to do at all.  The lanterns would have been way cuter if I had done them with tissue like the original pin, but everything I used was free, so I am not complaining!

Overall I give it an A+!  And by the way, I'm going to start using a 5 pin rating instead of the grading scale (thanks for that idea GoodGirlsInc!).  The teacher in me won't like it but...it's totally more appropriate.  I'm just working on the pin graphics.  Wish me luck! 

Thursday, October 27, 2011

Refinishing an Antique Buffet (again)

So I decided to refinish my great-grandmother's buffet (again)...because I saw it on Pinterest.

 "You Ask; You Receive"-This pin originally came from Just A Girl.

My grandfather's mother had a beautiful dining set which included a buffet.  My parents have the table but they didn't really have room for the buffet.  I needed a place to store my 16 place settings of china (how did that happen?) so I jumped at the chance to inherit it!

The only problem is that Jack, my sweet grandfather, sort of left his mark on it.  He is a little...accident prone.  Lets have a picture of Jack, shall we?

That's me (I was pregnant with Miss P at the time) and Jack.  He is a wonderful grandfather.  I miss him terribly.  He has Alzheimer's.  

Enough about that.

Anyway...Jack is quite a character.  

Here are a few facts about Jack.  He is the only person I know who has lost fingers...on both hands...in separate accidents...neither of which resulted from a work related injury.  

Also, he nearly lost his arm trying to saw limbs off a tree with a table saw.  While he was in the tree. 

And that brings us to how he scarred the buffet.  

It was a holiday.  My memory is foggy.  Maybe Thanksgiving?  My grandmother stored silverware and tablecloths and napkin rings, etc in the buffet.  Setting the table was a big deal to her.  Oh how she loved centerpieces!  

And we had one that holiday.  And it had a candle in it.  A lit candle... And Jack moved the centerpiece from the table to the buffet (knocking over the candle-he apparently didn't see it).  Which set the buffet ablaze.

And now I have this (once) beautiful buffet...with a huge burn mark on the top.  What to do?  

Spray paint, of course! And the good kind, too!  From Fred's.  Only $1 per can! (They reeeallly do need to invent a sarcasm font.)

Ah yes, that was a mistake. Shame on me.  It looked better with the burn.  My mom said not to spray paint it.  "Roll it!"  She must have said that like ten times.  But I did not listen.  And she was right.  

SHE IS ALWAYS RIGHT.

I mean, look at that.  Sad.  Just sad. 

And that mess has been sitting in my foyer for like 4 months.

So when I saw this fabulous buffet redo on Pinterest via Just A Girl, I decided I had to try to fix my mistake.  

I went to Lowes and bought the exact items they used.  Zinsser Cover Stain, a foam roller...but they didn't have the most important thing-Benjamin Moore Low Lustre (yep that's how you spell it) Metal and Wood Enamel.  I had to go to a specialty paint store.

And I was very disappointed because Benjamin Moore doesn't make that paint anymore.  Well, they say they do but the can is different and they've removed the word 'wood' from the title.  But the salesman assured me it was the same thing.  

$27 and 30 minutes later, I left the paint store in a sweaty mess.  "THIS ISN'T THE RIGHT PAINT!"  I kept saying that over and over.  

I seriously need...medication.  

I got back to my house and called the paint store. I made sure I was talking to someone I hadn't talked to while in the store.  And I nonchalantly asked them about the differences in the old 'Metal and Wood Enamel' and this new 'Metal Enamel'.  

"Just the can!"  Ok ok ok.  

See that Super Spec?  No mention of wood!  

Anyway, I wiped the buffet down with degreaser and let it dry.  Then I used the foam roller to prime it with the Cover Stain.  

The magic of Zinsser Cover Stain is that you don't have to sand anything!  And that is good because, as I've mentioned (and as you can tell by the previous pictures of my sad buffet), I am lazy. 


I started off priming in the garage with the door open.  But then I realized I was high as a kite and I quickly moved outside where I could breathe and hopefully lower my future risk of lung cancer.  

Sadly, I fear I may have waited too long to save the part of my brain that does long division.  What are you putting in that primer, Zinsser?? 

As you can tell from the picture above, my lazy struck again.  I didn't prime the front legs.  They are just too curvy! 

Meet my nemesis:

Now there's a guy who could not care less about his ability to do long division!

It took about an hour for the primer to dry.  While it was drying, I foolishly tried to wash the rolling pan and roller out.  With WATER.  

Sometimes I swear it's like I can't even read a label.  

I ended up just throwing them away.  Good thing I bought extras!


This is after just one coat of the Benjamin Moore (btw, it came in black so I didn't have to get it tinted). This paint is pretty amazing.  I was impressed.  Not sure if it is worth $27 A QUART...but it is good. 

And I'm wishing I'd taken this picture from a different angle because I clearly need to be tending my pitiful little flower bed.  Pine straw? Cedar chips?  Something! 

Yes, those are puppy pads...
The only thing I had to do a little differently than Just A Girl was use a smaller brush for the detail work.  There are lots of details in this buffet!  The sponge brush I bought was just too big and this paint is really thick. 

I ended up doing two coats of the Benjamin Moore.

And miracle of miracles...it looks great!!

See?
Now, I don't think it looks as great as Just A Girl's, but hey, look what I started with! 

Overall, I give this an A-.  And that is only because I will forever be wondering if the old version of that Benjamin Moore paint would have made this thing a masterpiece.  

And because it cost $27 A QUART!!  Geez.  

So go to the Goodwill and get yourself a piece of furniture and make it fabulous.  Or better yet, inherit something for free...because you'll need all your money for the paint  :)


Monday, October 24, 2011

Pretend Makeup from Nail Polish

So I decided to make Miss Precocious some pretend makeup...because I saw it on Pinterest.


"Faux Makeup for Your Kiddos"-This pin originally came from Emily at Not So Idle Hands.

Miss Precocious is a makeup destroyer.  She shatters glass bottles, digs her little fingers into my eyeshadow, pours out my loose powder, eats my Burt's Bees lip balm...I could go on and on.

So when I saw this on Pinterest, I had to try it!  Like yesterday.  
Because Emily is so RIGHT.  All the fake makeup at the store is REAL.  So frustrating!  

I just have to say that Emily is way more patient than me.  I didn't carefully clean my old makeup containers with soap and water.  I just knocked the remnants out into the trash and wiped them with a tissue.  
I also didn't buy realistic eyeshadow or foundation colored nail polish.  I just used what I had.  Which is like every shade of pink.  Ever.

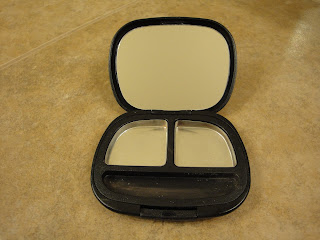
This is one of the empty containers after I had "cleaned" it (didn't realize how generous Beauti Control is with their eyeshadow until I was emptying this!):
Getting ready to fill a couple with shimmery shades (that Sally Hansen Sunset color is the only non-pink in my arsenal-thanks Mom!):
These turned out pretty cute!
And these are some FAILS!
Miss P got her little hands on the pink makeup on the left before it had time to completely dry and she put lots of sweet little finger dents in it.  And don't try to be fancypants like me and mix two colors together.  You can see how pretty that looks.  Its waiting for the trash pick up in the morning.

I waited a day before letting Miss P play with them.  Also, unlike Emily, I didn't pour the polish but rather painted it in.  I wanted it to be super thin so Miss P would have a hard time scraping it out (because of course she wants to scrape it out, just like she does my real makeup!).

I gave her some soft brushes to use and she has been a makeup artist (on her daddy's face) all weekend!  "Oh Daddy. So puuuuty!"  Love her!

Overall, I give this a big A+!  Amazing!!  Wish I had known about this little trick four broken eyeshadows ago!  Save yourself a mess and make some for your little one.

Saturday, October 22, 2011

How To Clean A Glass Cooktop

So I decided to clean my glass cooktop...because I saw it on Pinterest.


"How To Clean Your Glass Cooktop"- This pin originally came from Jayna at Behind The Studio

I am lazy.

I make messes and leave them for so long that they make their own messes.

I am especially lazy about cleaning the cooktop.  I think I only ever use the front right burner.

Isn't burner an appropriate term for something that is constantly involved in me burning dinner?

Anyway, there was a huge ring around the right front burner.  Mostly dried oil and boiled over macaroni and cheese.  Nasty.  I keep losing my Ceramabrite.  Not that it is that effective.  So this is what it looked like when I started:


Overall, pretty dirty. Especially that right burner.

The first step, according to Behind The Studio, is to cover the affected area in a generous amount of baking soda (I used Arm & Hammer) while soaking a towel in a bowl of hot water and dish liquid (I put like a teaspoon of Palmolive).

I'm just focusing on the offensive right burner for now.  I don't want to overexert myself by trying to clean the entire thing at once.


I squeezed about half of the water out of the rag and covered the baking soda-ed burner with it.  Then I set the timer for 15 minutes.

A lot can happen in 15 minutes.  In my case, I decided to eat some pizza that had been cooking in the oven. (Note to self: don't leave boxes of baking soda on the cooktop while the oven is on. The heat will make the box stick to the cooktop, thus creating more for me to clean. Sigh...)  I was on the second bite when my sweet little (naked) girl came riding through the kitchen on her stick horse.  She was singing but stopped abruptly.  I looked over to see her make a strange face and then I heard...splat.  Potty training a toddler is such an adventure.

Ok, so after 15 minutes (and a bath for the little one), I used the towel to scrub the cooktop.  This is what it looked like:


I must have done something wrong.  Pretty sure it shouldn't look like this. So I started over.  More baking soda to the burner and more soaking under the hot, wet rag.


You can totally see where I used this side of the rag to scrub during my first attempt.  Ewww... <Shame>

I waited 15 more minutes and scrubbed with all my might.  But it really wasn't coming up very well.  So I got out the little scrub pad that came with the cooktop.  Its the square yellow thing in the picture below.

I scrubbed for like 15 minutes.  It was awful.  I hate manual labor.  But I could feel the goo coming off gradually.

After I had scrubbed as much as I was willing to in one night, I used a clean wet rag to wipe off the baking soda.  Then I sprayed it down with Windex.  This is the finished product:


As you can see from the picture above, there is still a little goo stuck on the burner.  But this process really did get most of it off.  And if I had scrubbed a little longer, it would have all come off, I'm sure.  Also, keep in mind that my goo was like...a year old.  Seriously.  I am a terrible housekeeper.

I did this little experiment at night.  When I look at my cooktop this morning with the sunlight coming in, I can see lots of scratches.  I am sad about this, but I don't know what is worse-goo or scratches.  

So overall, I give it an C- . This may be a fabulous, harmful-chemical free way to clean your cooktop-if it isn't as dirty as mine!  So don't wait a year before you try it...