Showing posts with label For the Little Ones. Show all posts

Wednesday, January 4, 2012

Vintage Little Tikes Kitchen

So I decided to make-over my vintage 1980's Little Tikes Kitchen Set...and put it on Pinterest.


This pin originally came from  imremembering.com but I couldn't find the direct link to this picture on that site.

OH MY WORD!!!  I cannot tell you how excited I was to find this amazing Little Tikes ad!  I have been searching and searching the internet for a picture of this particular 3 piece kitchen set because it is the very one Santa brought me for Christmas when I was 4 (and it changed my life)! But I could never find a picture of it! 

Until tonight.  Sweet joy.

I wish I had a picture of my little 4 year old self on that blessed Christmas morning.  I know it exists...

Anyway.  This kitchen set is what I think of when I remember my childhood.  It was my favorite toy that I ever owned.  I played with it for hours and hours.  I cooked everything imaginable for my friends and family.  And I probably played with it until I was really too old to be doing such things. 

But I loved it so...  So much that instead of Goodwill-ing it, my sweet parents stored it away in the attic.  Apparently they loved it too.

Jump forward 20 something years into the future.  Miss P is two and my mom asks if we want to get out the old kitchen set for her.  My heart leapt in my chest!  YES!

Oh but it had seen better days.  The decals were peeling in places.  It was really dirty.  Some aspects of it seemed really ridiculous (even for the 80's).  I mean, did people really have tape players in their refrigerators?  Hmm...

Also, my dad had moved them from the attic to the garage in preparation of my picking them up.  And then he painted said garage with a Wagner.  Which totally sprayed paint all over my little kitchen set.  (Remember the stories I told you about my grandfather?  That nut did not fall far from the tree, let me tell you.)

So it was obvious from the start that my precious kitchen set would need a pretty radical overhaul. 

This is what it looked like when I started.  


That stuff that looks like dirt on the stove...nope.  That's paint.  Thanks Dad :)

Wonder if I left anything in there?


I think that fruit salad is still good!

Anyway, I decided to remove the labels first.  Orange and brown just aren't my favorite colors anymore.  Here's a handy little tip.  If you want to remove a label without leaving a mess behind, hold a hairdryer to the label for a few seconds.  It melts the glue and you can remove it all cleanly!  

Once the labels were off, I scrubbed the set with some degreaser.  Then I sprayed the pieces with Krylon Fusion for Plastic in River Rock.  Let me just say, I hate Krylon spray paint.  It is the worst product on the market in my opinion.  However, the Fusion line is decent.  And it's pretty much the only thing out there that can stick to plastic.   

In hindsight I wish we'd chosen a whiter color because the River Rock actually turned out to be a pretty dark gray.  Sigh...


As you can see I just covered the entire piece with paint.  I thought it would be easier to paint the details back in than to try to preserve them. 

I used Apple Barrel craft paint and scrapbook embellishments for the details.  I think they turned out ok.  What do you think?


The awesome tape deck is now a 'crushed or cubed' ice selection center and I replaced the wooden cutting board with a pretty pink damask cutting board.   I didn't touch the inside of the pieces.  I just couldn't get rid of the awesome fruit salad...

I'm so glad this memory from my childhood will now be included in my little one's memories of her childhood.  I can't tell you how many tea parties we've had since Christmas morning! 

Cheers!

Monday, December 19, 2011

Personalized Letter From A Disney Princess

So I decided to write a letter to Tiana of The Princess and the Frog...because I saw it on Pinterest.

"Write a Letter to Your Favorite Disney Character and Get an Autographed Picture in Return"-This pin originally came from Couponing to Disney.

(This post originally began in Novemeber.)

Miss Precocious is obsessed with The Princess and the Frog!  Obsessed!


Except it sounds more like "The Friendses and Frog" when she is demanding to watch it.  And I will surely miss it when it comes out sounding right...

Anyway, I saw this pin that says you will receive an autographed picture of your favorite Disney character if you send them a letter to this address:

Walt Disney World Communications
P.O. Box 10040
Lake Buena Vista, FL 32830-0040

Or, if you'd prefer, you can receive a black and white photo if you write to your chosen character at this address:

Walt Disney Company
Attn: Fan Mail Department
500 South Buena Vista Street
Burbank, CA 91521

The black and white photos take longer to receive and if I'm being honest, patience is not really on my list of virtues.  So our letter is definitely going to Florida.

I used one of the homemade envelopes from an earlier postLOVE these!  And they are totally fit for a princess.


Our letter was simple: 
 
"Dear Princess Tiana, 
I love you and I can't wait until I am big enough to come visit you.  Until then, could you please send a picture?
Love,
Miss P"

And because most of you don't know me and you can't actually picture me doing this, I will tell you that I literally ran alongside the mailman's truck trying to give him this letter.  And it was hysterical (not for me, but for anyone who might have been peeking out their window).

I had just missed getting it in our box but he was still on my street.  Yet somehow he didn't see me running along side him.  Or my fat dog. Or my hysterically laughing toddler.  Imagine that!  (Told you he hates me!)

Since he 'didn't see me' and the letter didn't get mailed today (Thursday) it will go out on Saturday because tomorrow is Veteran's day and the mail won't run.  Now I'm getting annoyed that he didn't see me because that letter is going to sit in our mailbox for two days...  OK so mailed on the 12th of November.  And...

Did we receive a response from Tiana?

Yes!  Today is 12/19 so just about 5 weeks later we received a lovely postcard.


Signed by ALL of the Disney Princesses!  Miss P was beside herself with joy when we got the mail today!  (It's the little things.)


What a fun way to surprise your little one!   And it will only cost you $0.45.  Can't beat that!

Thanks Pinterest!

Monday, October 31, 2011

Happy Owloween!

So I decided that Miss Precocious should be an owl for Halloween...because I saw it on Pinterest.
 "Last Minute Kids' Owl Costume"-This pin originally came from Alpha Mom

I am a Chi Omega and of course it is my sincerest (secret) hope that Miss P will be one as well.  So I'm doing all I can to brainwash her instill in her a love of all things owl before she goes to college.  So far this has included an owl-themed birthday party, owl clothing, owl lovies...and most recently, an owl costume for Halloween.

Or Owloween as I'm now calling it.

I saw this cute little do-it-yourself owl costume on Pinterest.  I read the info over at Alpha Mom and I thought I would give it a try.  

The last two costumes we bought were cheaply made and I'm sure they were fabricated from formaldehyde or something even worse.  So I was really excited to make a costume that I knew didn't involve neurological toxins or Asian sweat shops!

These are the materials I chose:


That's a roll of lavender organza, gray knit, pink felt, and a purple bandana.

Yes, a bandana...

And there is no way Miss P would ever keep those cute sunglasses on (the little model from the original post is wearing sunglasses made to look like owl eyes) so I decided to look for an owl hat instead.  I found this one over at The Children's Place.  

Super cute, reusable for the next few winters, and it was only $5 when I bought it!  Fab!

I chose the fabric colors around the color of the hat.  Actually choosing the fabric was the most difficult part of the entire project.

You see, shopping is not easy for me!  I have a disease.  They don't have a medical term for it yet (this is all very serious).  So I'm calling it Retail Anxiety Disorder.  RAD for short.  

I get sweaty and twitchy when I have to make a decision about what items to purchase. I probably looked like this in the middle of Hobby Lobby:

It isn't like this at the grocery store.  There I have a specific list that includes brands, quantities, etc.  

But send me out clothes shopping or, in this case, to find material, and I need four Xanax and a glass of wine! 

That explains why I panicked and bought like...10 yards of fabric (and a bandana).

For someone who is something like 26 inches tall. 

Sigh...

Anyway, the base of the owl body is a plain purple t-shirt from Hobby Lobby.  They have so many colors to choose from!
I would have used a long sleeve shirt but I just couldn't find one that was cheap enough to justify gluing feathers to!

I cut out about 90 feathers.


I ran a strip of hem tape about an inch above the hem of the shirt. 

I chose hem tape because, well honestly I couldn't find my fabric glue. It was one of the things we lost in the move.  (Think very dramatic, like Halle Berry, Things We Lost In The Fire.  Except it's "Fabric Glue-Things We Lost In The Move.")

After I had the hem tape ironed down, I placed the feathers onto the tape in no particular order.

Yeah right!  I am the QUEEN of OCD.  Of course there was an order!  But I tried to make it look like there wasn't.  Can you tell?


I am really glad I accidentally picked a variety of fabrics because when I laid them out next to each other, the texture was really good.

After I got a row of feathers lined up, I just pressed down with all my might using the iron (on the highest dry setting).  Now, I will admit that felt and organza are not the best choices of fabric to pair with hem tape. The felt is too thick and the organza is too thin.  I ended up hot gluing the felt pieces on so they wouldn't fall off.

I made a ring of feathers around the neck.  I may have had to cut the neck a little bit for Miss P's large and precious head to fit through...

And since I had like, oh I don't know, 9 yards of fabric left, I decided to cover her pumpkin tote in feathers too.
I just hot glued those on. Man, I love a hot glue gun!  I can't think of anything else so versatile and useful that only costs $2!!
And here is my little baby hootie testing out her "owl suits" as she calls it.

Hoot Hoot!

So this project was a little time consuming, but it turned out so cute.  I totally love it!  I give it an A++!!  Especially since you could pretty much do this for free using any fabric scraps you might have laying around instead of buying fabric like I did. 

Be extra sweet to any little hooties that come your way and have a Happy Owloween everybody!

Monday, October 24, 2011

Pretend Makeup from Nail Polish

So I decided to make Miss Precocious some pretend makeup...because I saw it on Pinterest.


"Faux Makeup for Your Kiddos"-This pin originally came from Emily at Not So Idle Hands.

Miss Precocious is a makeup destroyer.  She shatters glass bottles, digs her little fingers into my eyeshadow, pours out my loose powder, eats my Burt's Bees lip balm...I could go on and on.

So when I saw this on Pinterest, I had to try it!  Like yesterday.  
Because Emily is so RIGHT.  All the fake makeup at the store is REAL.  So frustrating!  

I just have to say that Emily is way more patient than me.  I didn't carefully clean my old makeup containers with soap and water.  I just knocked the remnants out into the trash and wiped them with a tissue.  
I also didn't buy realistic eyeshadow or foundation colored nail polish.  I just used what I had.  Which is like every shade of pink.  Ever.

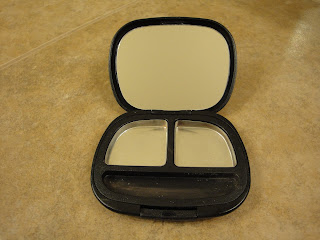
This is one of the empty containers after I had "cleaned" it (didn't realize how generous Beauti Control is with their eyeshadow until I was emptying this!):
Getting ready to fill a couple with shimmery shades (that Sally Hansen Sunset color is the only non-pink in my arsenal-thanks Mom!):
These turned out pretty cute!
And these are some FAILS!
Miss P got her little hands on the pink makeup on the left before it had time to completely dry and she put lots of sweet little finger dents in it.  And don't try to be fancypants like me and mix two colors together.  You can see how pretty that looks.  Its waiting for the trash pick up in the morning.

I waited a day before letting Miss P play with them.  Also, unlike Emily, I didn't pour the polish but rather painted it in.  I wanted it to be super thin so Miss P would have a hard time scraping it out (because of course she wants to scrape it out, just like she does my real makeup!).

I gave her some soft brushes to use and she has been a makeup artist (on her daddy's face) all weekend!  "Oh Daddy. So puuuuty!"  Love her!

Overall, I give this a big A+!  Amazing!!  Wish I had known about this little trick four broken eyeshadows ago!  Save yourself a mess and make some for your little one.