
So I decided to make a framed burlap earring holder...because I saw it on Pinterest.

"Framed Burlap Earring Holder Tutorial"-Original pin by Positively Splendid
Do y'all remember my mom? The amazing lady who gave me life and a stand mixer? Well I have been wanting to help her devise a plan to sort her 843 pairs of earring for some time now. When I saw this framed burlap earring holder I was smitten. It's perfect. It's so out of the box!!
Like literally out of the jewelery box. It's perfect. And it can hang on the wall in her closet and take up zero space. Truly the best idea I have seen in a while!
I haven't had time to make it until now, which is actually perfect because I can give it to her for Christmas. She's been extra nice this year :)
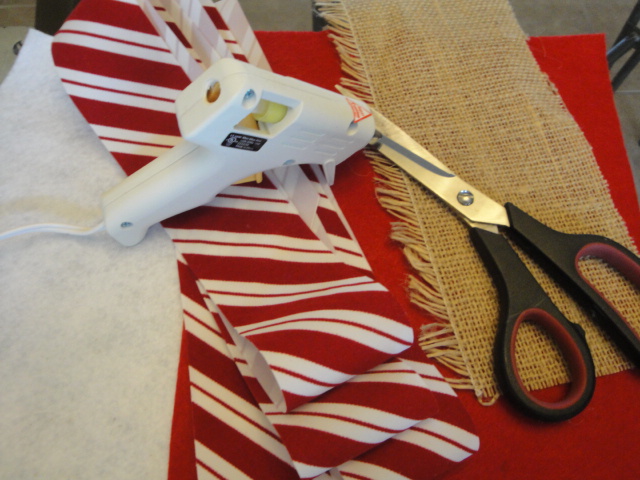
This is what I started with:

You will need a frame, piece of burlap just larger than your frame, and some hot glue or a staple gun. If you want to add an embellishment (like a monogram) on the burlap, you will need a permanent marker. And I used some felt and ribbon to make a flower for the corner.
The frame is recycled. I had a picture in it that really highlighted my unfortunate case of UFD. And that sort of spoiled the frame for me. I even changed the picture once to see if that helped, but it was too late. So I'm really glad to give this frame new life at a new home!.
First I removed the glass and backing of the frame. Then I cut a little notch in the burlap to accommodate the wall hook.

I really should have been a little more careful when ordering my burlap because I just barely had enough to cover the frame. I haven't been crafty long enough to know how to order fabric, apparently.
Which I was regretting when I tried stretching my burlap during the hot gluing process because there wasn't any hanging over the sides to pull on.

So I had to pull on the piece as I was gluing it down, which made for some very sad, hot-glued fingertips. Lesson learned (hopefully).
I stretched it as tightly as possible all around the frame and trimmed off the little bit of edge I had on two of the sides:

After I had the burlap stretched as tight as I could get it, I decided to check the original post for instructions. Did I just hear you ask, "Why didn't you check it before beginning the project?"
I'm thinking of renaming my blog 'Because I Saw It On Pinterest and Didn't Bother to Read the Instructions.' Because no matter what lesson I supposedly learn every week, I still fail to read the directions on the next project. For example, the tutorial over at Positively Splendid clearly says (in Step One!), "Spray your piece of burlap generously with your spray starch, and iron the piece until it is dry." I was too lazy to read that little bit of helpful info. And it was the first sentence of the tutorial. Lazy.
So here I am with scalded fingertips looking at my already-glued-down burlap...
I did what I had to do.

No, my Magic Sizing doesn't defy the laws of Physics. Note to self...figure out a way to import pictures without making them read-only! Not being able to turn them around is maddening!
All starched, ironed, and glued into place:

You could stop here but the next steps are the most fun...decorations!!
Now fancy pants Positively Splendid says to use a die cut machine to make a letter stencil. But I don't have a die cut machine. Mostly because there are about 100 things higher up on my list of items to buy with $250.
Like groceries :)
This is a working girl's version of a Cricut:

Yes. PowerPoint and a pair of scissors.
I used a blank template, Mongoli font set at 800pt, and I chose the 'no fill' option (no sense in wasting ink!). I also rotated the text box to portrait so that I could get my monogram as large as possible on the paper.

I just taped my ghetto stencil down on the burlap and traced the inside of the stencil with my black magic marker.

Then I removed the stencil and filled in the letter.
Now who's fancy?
Again, I really could have stopped here and I would have been totally happy with the way it looked but I wanted to try felt flowers. I have never made them before and Positively Splendid has another tutorial about how to make the cute felt and burlap flower shown on the original frame.
I used red felt and some candy cane striped ribbon to make my flower. And burlap for the leaves.

The ribbon is 2in wide and I cut about 8in off. This will be the center of the flower. I folded it in half lengthwise and glued it down the edge. Then I cut in at the fold about every half inch. I didn't take a picture of this process for the ribbon because I didn't think it was going to work. I don't remember why I thought that because it totally did!
Next, I cut the felt 3in wide and I think the square I had was 10in long. (I wish I could be more precise but if Miss P sees a sticker-like the one on the back of the felt square that told the size- nothing can stop her sweet little hands from stealing it...and sticking it somewhere like the glass window of the oven...where I will never be able to fully remove it.)
I did take a picture of the gluing process for the felt:

Anyway...I cut it on the folded non-glued side about every half inch.

Next, I started rolling the center striped piece around itself (petal side up) and glued the end down. Then I glued the red felt around the center piece.

Now doesn't that look nothing like Positively Splendid's flower?? I swear I read the instructions for it. But no matter. I think it looks cute anyway!
I cut out two burlap leaves. But I didn't like the look. What do you think?

So no leaves it is! I just glued the flower down to the frame and it was done.

I love it!
And I'm glad the frame is so big because my mom is seriously an earring hoarder. But I like that about her! Its her thing. An earring for every occasion.
Overall I give this project an A+! It was nearly free. I already had everything but the burlap which cost about $1.50 for half a yard. The felt flower was a little annoying because I kept trying to make it look like the original pin. But when I decided not to be frustrated, the flower suddenly became pretty cute.
The best part of this project is that I know my mom is going to LOVE it! And it is going to be super useful for her. I'm going to keep this one on my list of possible gifts for future occasions. I mean, who wouldn't want one?
Have fun making yours!
Thanks for great instructions! you remind me so much of myself, barely looking at instructions due to excitement and getting right down to the craft making. LOL! I love what you did, turned out so cute. and yes, must must improvise...everything costs sooo much. i myself don't have one of those fancy cutting machines. can't wait to make mine! I make jewelry as my hobby (www.jewelsbydaisy.com) and am going to make vintage photo frame earring displays using burlap for my next event. woohoo! i'm excited!
ReplyDeleteClassy! Did you have any trouble with the burlap sagging over time from the weight of the earrings? I've heard of putting mesh behind the burlap and I was debating if that was necessary. What do you think? Thanks for sharing!
ReplyDeleteHaving said that, portable table saws lack sufficient enough power to cut through thick hard woods and tend to be inappropriately designed to give the true precision in which exceptional carpentry asks. power tool reviews
ReplyDeleteThis is a clever and practical solution for earring organization.
ReplyDelete